Topo Map Project
|
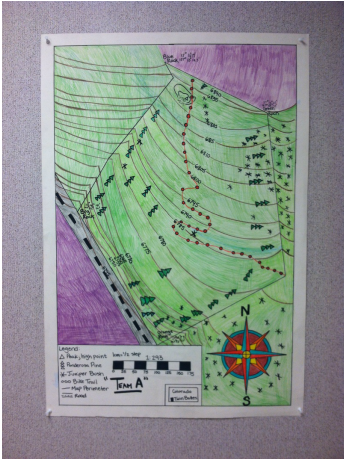
Methodology behind the Map
Isabel Ellie Mitchell Luke This project was about making a topographic map of the Twin Buttes area. Our class had the ability to access the Twin Buttes forest by taking a short walk. In order to measure the size of the map area, we took a compass and pointed it in the direction that we wanted to go. We then measured the degrees from magnetic north. Then we walked in the direction and counted the number of steps before we ran into the rock (corner of the map). Once we were back in the classroom, we used a circular protractor in order to predict the direction we went. After that, we converted the number of paces or steps into 2 cm per step. In order to plot the contour lines on our map, went to google maps and used a tool that gave a visual example of the elevation compared to sea level. With this, we took the image that Google Maps gave us and used our own experience with the terrain to plot the contour lines (the brown lines going across the map). This mean that where the lines are is where the terrain is steeper. We also had to use logic to see if our map was correct. This is because there was a margin for error and I had to be certain that it wasn’t wrong. |
|
Rocket Project |
|
Day 1 Entry 1- Today we figured out what our rocket will look like. We decided to do the kilo lift.
Day 2 Entry 2- Today we will glue 6 bottles together. 1 hour later- We forgot to sand! We are SO dead!
Day 5 Entry 3- Today is a launch day. Launch the big guy! 1 hour later- The big guy is blown in half. Fixing at lunch.
Day 6 Entry 4- Glueing a second rocket to be safe. We need a tip and a parachute.
Day 7 Entry 5- Test Day. Second rocket blown out, I trashed it.
Night 10 Entry 6- Mitchell worked on a parachute, he reinforced it, it should hold a kilo up. Also glued on new nozzle and tip. The kilo is more enforced and padded.
Day 11 Entry 7- Worked on our parachute and made up the name.
Day 12 Entry 8- Used hot glue and attached fins and painted it. We are ready for launch day!
Rocket Reflection By Mitchell Anderson
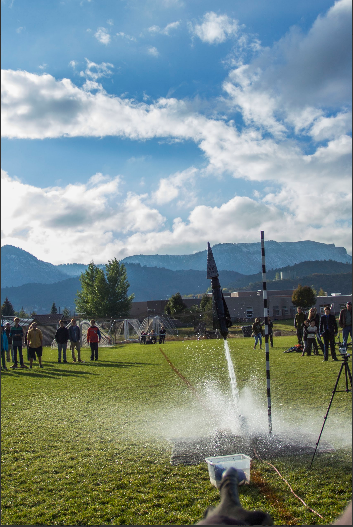
The Mega Death Destroyer rose into the sky. Yes! It flyes. As it rose, my heart rose with it. It had sproun a leak on the launch pad and I didn’t think the 16 Newton rocket would fly. It was probably the best day of my life. The pride I felt was amazing and awesome. It rose 33m, or about 108 feet, and I didn’t even think it would fly. This was the best launch I had seen yet for my rocket. That night I was totally stoked.
If I was alowed to do the project again, I would do some things very differently. If I had used a single bottle at 120 psi it would have done much better. I would tell future rocketeers that fins in the middle of your rocket because it doesn’t fall over mid flight. Also I would have said that a wide flat nose cone will come off easier. Also, do not use plexiglass, it is the bane of your rocket. Use the instruction that Schapstick gives you. Good luck!!!
Conclusion
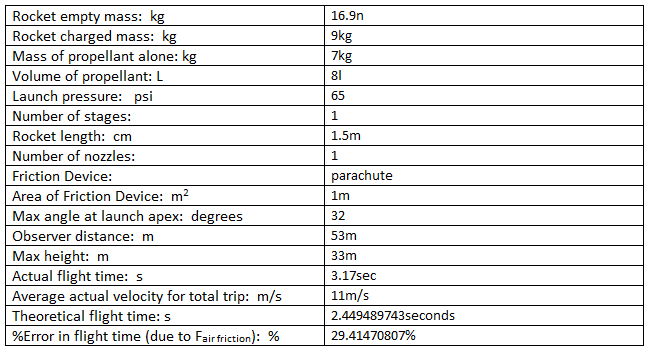
Mitchell’s, Kyle’s, and Cameron’s rocket angle from 53m away was 32 degrees. Their hang time was 3.17 seconds. To find their max height they used this equation; 53tan___=___m. The filled out equation is 53 tangent(32 degrees)=33m. To find the velocity (meters per second) they used this equation; height/flight time. The filled out version is 33m/3.17seconds=11m/s. The equation they used to find hang time and theoretical was t=square root of (max height/1/2a). The filled out form is t=square root of (33m/1.5). The theoretical hang time was 2.449489. To find the error in the flight time they used this equation; |(actual-Theoretical)/Theoretical|×100. This equation filled out is |(3.17-2.44)/2.44)×100. This equals 29.494 percent. The error was because the rocket didn’t fall with our nose cone down, so they had a different amount of friction.
Rube Goldburg Contraption
|
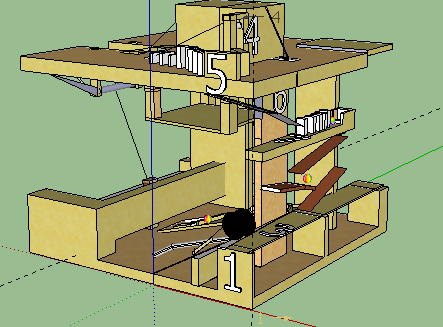
Rube Goldburgs are large contraptions. The point of a rube goldburg is to accomplish a simple task with many complex tasks. The requirement for our Rubes were they had to run for 15 seconds and have at least 15 steps. My rube had 17 steps and ran for about 16 seconds. This project was very hard for me. I showed up at every extra work time and did almost no talking to other people. However, my result was perfect. It was created almost entirerly by me and it did very well. My teammates were not very helpful, but I still pulled it off, BY MY SELF! I created, came up with and perfected it. The Calculations were also done be me, as well as the SketchUp to the right.
|
|
